A quick note before we get to the recipe: these patties are basic for the reason they can be used in many different ways. You can easily customize them. I will probably use some for taco “meat” later this week, and I’ll probably use some as “meat” for a spaghetti type sauce. I wanted to have something basic and easy to make so I can have it on hand in case I needed to make something quickly. These patties also freeze fairly well, but they will be crumblier once thawed out.
Ingredients:
2 cups cooked green/brown lentils (I cooked mine in Better than Bullion’s vegetable base)
1 1/2 cups cooked quinoa (Again, cooked in Better than Bullion’s vegetable base)
1/4 cup vital wheat gluten
2 tbsp oil of choice
salt and pepper to taste
Method:
Mash the lentils most of the way, leaving some for texture. Stir in the quinoa, gluten, oil, and salt and pepper if using. You can also use a gluten free binder if you’d prefer. The gluten just helps hold the mixture together. Measure out 1/3 cup portions onto a parchment lined baking sheet and form into rounds. Bake at 375* F for 12 minutes, then flip and finish baking for another 7-10 minutes until both sides are slightly golden and the patties don’t squish when lightly pressed. Cool completely on a wire rack for maximum crispiness. Store in the fridge for up to a week, or freeze for up to a month.
Dressing for the salad above (not pictured, it wasn’t pretty):
2 tbsp peanut butter
1 tbsp maple syrup
2 tsp Sriracha hot sauce
2 tsp soy sauce
1 tsp sesame oil
1 tsp rice vinegar
1/4 tsp ground ginger
dash each of garlic and onion powder, black pepper
Splash of water to thin it out if desired
Whisk all ingredients together in a small bowl and pour over the salad.
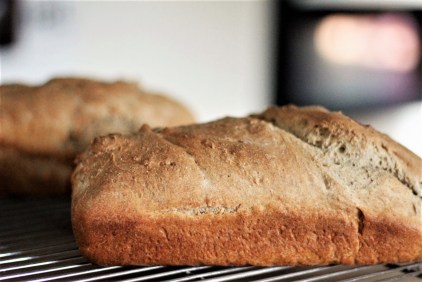
If you’re after a hearty brown bread, this is it. I’ve made a lot of bread in my life, and this is by far my favorite in terms of flavor. I admittedly underbaked mine, so I recommend going to 40-45 minutes when baking, but the result is a chewy, delicious bread.
Another note: the coarseness of the rye will rip the gluten strands during kneading, but that’s why we add extra all purpose flour. You could do this with bread flour, but I’d test the dough after the 3 cups are added. You could also add in 2 tbsps of vital wheat gluten if you don’t have bread flour, but I didn’t use it in this recipe because I don’t know who all has such an ingredient.
The coarser flour tends to hydrate faster since there’s not as much gluten in it, so combining the white and the rye flour helps balance. Test your dough after adding three cups and add in the fourth cup during the kneading process if you notice it’s still too wet. I think in total I had 4 and 1/3 cups flour. It might be different for you, though. The dough should be slightly tacky, but not sticky.
Combine these into a large bowl and whisk to dissolve the sugar and yeast. Let sit for 10 minutes–really do let it sit for ten minutes. The yeast needs time with this type of bread.
2 tbsp melted butter (I used plant based)
1 tbsp kosher salt
2 cups rye flour
3-4 cups all purpose flour
Stir in flours, salt, and butter, and mix until a dough forms. Once dough forms into a ball, move to a well floured surface and knead for 10 minutes, adding more flour as needed to prevent dough from sticking to the surface. This part could also be done in a stand mixer, but as I make bread by hand, I don’t have time measurements for how long to let it go in a mixer. The dough should spring back when gently pressed.
Set dough in a bowl in a warm place, loosely covered, until doubled in size. Since it’s a heavier bread, it’ll take longer than an hour. Mine took about 1 hour and 45 minutes.
Gently fold dough out of the bowl onto a clean surface, floured if dough is tacky, and divide into loaves. Grease loaf pans and let rise again for 45 minutes. Preheat the oven to 400* F in the last fifteen minutes of the rise time. Bake at 400 for 5 minutes, and then lower the temperature to 375 to finish baking. This bread will take a bit to bake. I recommend checking it at the half hour mark, but it’ll probably take closer to 45 minutes.
Remove from pans and let cool completely on a wire rack before slicing. Makes 2 loaves.
Hello! This week? Lasagna roll ups! These are about the same amount of work as a traditional lasagna, but they’re individually portioned, making for easier serving and portion control. Serve with salad for a complete meal. See my notes at the bottom for clarification on ingredients. Otherwise? Let’s get you rollin’.
For the tofu ricotta:
1 block of firm tofu, drained and pressed*
1/4 cup nutritional yeast
2 tbsp maple syrup
2 tbsp plant milk (I used oat)
1 tsp salt
1/2 tsp each garlic and onion powder
1/4 tsp citric acid*
For the “meat” sauce:
1 cup of TVP*
1/2 cup of vegetable broth
1 15 oz can of tomato sauce
1 tsp of dried basil
1 tsp of dried oregano
1/2 tsp of salt
1/2 tsp of black pepper
Boil water and prepare 6 lasagna noodles according to package directions, cooking to al dente. The pasta will finish cooking in the oven.
In a food processor, crumble the tofu and then pulse for about ten times. Add in the remaining ingredients and process till the mixture is smooth. Adjust for seasonings if you want more salt or more pepper, or add in more nutritional yeast if you’d like. Honestly, this “ricotta” is the closest tasting to actual ricotta I’ve had yet, so I recommend making it as listed above. Once it’s combined with the sauce and the pasta, the flavors work really well together.
In a small mixing bowl, combine the TVP and the vegetable broth and allow to rehydrate for about ten minutes. Add in about 3/4 of the can of tomato sauce, and add in the remaining ingredients. Combine, and set aside.
For the rolling, I used a baking sheet to hold the pasta so I wouldn’t make a mess on the countertop, but you don’t have to. You’ll need a smaller baking dish for this, since there’s only six servings in this recipe. I recommend glass. If you want to make more, simply double the recipe and use a bigger baking dish.
Once the pasta is al dente, drain and return to the pot. Take one noodle and lay it flat on the baking sheet (or countertop). Spread the ricotta down first, using about 1/3 of a cup per noodle. Spoon on some of the sauce, again about a 1/3 of a cup. Roll from the bottom up, and place in a well greased baking dish. Repeat with the remaining pasta till all is used. You might have some ricotta left over. Simply store in an airtight container in the fridge for up to five days. Use the remaining tomato sauce in the can by mixing it with any leftover sauce in your mixing bowl. Spoon onto each roll up.
I put some Daiya mozzarella style shreds on top of my roll ups, but you don’t have to. Bake at 375* F for about 25-30 minutes. Serves six.
You could also get this prepared and then freeze until ready to use. I’d recommend only for a maximum of three months, though.
*Notes*
Ricotta: Draining and pressing the tofu is a big step for this. I usually don’t press my tofu, just squeeze as much water out as I can, but for this I pressed it. Doing so gets rid of even more excess water and won’t make the tofu runny. I also used citric acid because I didn’t want the flavor of lemon in my ricotta. You absolutely don’t have to go out and buy citric acid to make this. Use a tablespoon of lemon juice, or two teaspoons of apple cider vinegar instead.
Sauce: Instead of TVP, you can use frozen “beef” crumbles, such as Gardein, etc. Brown the crumbles first, though, before mixing into the sauce. You can also use a jarred sauce you know you like instead of making the sauce above. Personally, I don’t enjoy chunky sauces.
When it comes to burgers, I don’t really find the options for vegetarian burgers to be very appetizing. Not that I like the texture of meat, but I need something with a bit more chew than most offer. I’ll be honest, I don’t like to purchase the pre-made grillers out there, even though I have some in the freezer right now. It all goes back to my biggest pet peeve with myself — convenience food.
If it’s an easy thing to pop in the microwave, or rip open a package and there’s my food, I have a love hate relationship with it. My love is the ease in which I can feed myself. Unless I use canned goods like beans, or frozen vegetables, preparing a meal often takes a while, and I’m usually tired when I’m hungry. Snack foods are always a good option, but again those can be highly processed or contain things I can’t pronounce even if they are on a vegan labelled snack.
I set out a while ago to create a mock chicken patty to give me that chew of a burger I miss. After several failed attempts, I finally managed to create something edible. I’d even go so far as to say it’s delicious. I can pronounce all of the things in it. And there’s even a gluten free option! You can have your burger and eat it, too. Or something.
Photo by Chelsea M.K.
I do have a few notes about this recipe, though, and I’d share my actual page where I made them because you can see me devolving into “I’m not sure what this is anymore” on some earlier stages. For the gluten free option, the batter will be firmer and needs to cook longer. I absolutely do not recommend baking the gluten free one. It came out dry and gummy all at once, and that was something I can’t ever say I want in my mouth again. Frying these will give it a lovely golden brown color that makes it all even more appealing. Patience is key in this recipe because even though it takes a while, the payoff is worth it.
I think the seasoning in it makes it great without a sauce and just lettuce and tomato keep it simple, but delicious all the same. I’ve been having it with some Daiya slices as well–the cheddar and American–and it doesn’t distract from the flavor of the food. Without further ramblings, I give you the no chicken patty.
Photo by Chelsea M.K.
No Chicken Patty (with Gluten)
1 cup TVP (textured vegetable protein)
2 cups vegetable broth (I used Better Than Bullion’s No Chicken Base)
2 cups flour
3 tbsp vital wheat gluten (you can leave this out, just add about 1/4 cup more flour)
1 tsp worcestershire sauce (vegetarian friendly)
2 tsp poultry seasoning (no meat in it, just the herbs and spices)
1/2 tsp onion powder
1/2 tsp parsley
1/4 tsp garlic powder
1/4 tsp salt (you can adjust the salt to your taste, but if you use the BTB base, it’s pretty salty already)
4-5 tbsp oil for frying (I used straight up vegetable oil)
Method:
1. In a large mixing bowl, combine the vegetable broth, worcestershire sauce, and TVP. Let sit for about ten minutes for the TVP to hydrate.
2. Add in the flour, wheat gluten (if using), and seasonings. Stir to combine. This will make a sort of wet batter, but that’s okay.
3. Heat the oil in a large skillet and when the pan is ready, scoop 1/2 cup of the batter into the oil. Spread the batter into a single layer, maybe 2 inches in diameter. You can make square patties if you’d like, but the circular ones fit better on a bun.
4. Cook for 3-5 minutes, or until the top starts to dry out. Check to see if the bottom is golden brown, and then flip the patties to continue cooking on the other side.
5. Remove from the pan and allow to drain on a wire rack. Add more oil to the pan if necessary and continue to cook till all the batter is used.
6. Serve immediately, or let cool completely before storing in the fridge for 5-7 days.
7. These will bake moderately well if you’d prefer not to fry. Oven at 375 F for 10 minutes, flip, then five more minutes. They don’t brown as nicely as frying, but they still taste fine.
No Chicken Patty (Gluten Free)
Ingredients are the same as above, minus the flour and vital wheat gluten. Instead, add 2 1/2 cups of rice flour (plain rice flour), and 1/4 cup of oil (your choice, I used grapeseed). The batter will be firmer, and lighter in color.
To cook, simply cook 5-7 minutes on one side, then flip and continue cooking till the other side is golden brown. A little longer on the cooking process, but tastes just as great.